OneKE Service (Kubernetes)
Appliance Description
OneKE is a minimal hyperconverged Kubernetes platform that comes with OpenNebula out-of-the-box, based on RKE2 - Rancher’s Next Generation Kubernetes Distribution.
Main Features
OneKE includes preinstalled components for:
- Storage persistence with Longhorn
- Ingress traffic with Traefik
- Load balancing with Cilium, MetalLB, or ONE Cloud Provider
 Hint
Hint
For additional OneKE components and versions, in the Appliances Marketplace use the search bar to filter for “OneKE”.Requirements
- HyperCX >= 10.9.2.
- OneFlow and OneGate for multi-node orchestration.
- Recommended Memory per VM: 512 MB (vnf), 3 GB (master), 3 GB (worker), 3 GB (storage).
- Minimal Cores (vCPU) per VM: 1 (vnf), 2 (master), 2 (worker), 2 (storage).
Architecture Overview
OneKE is available as a Virtual Appliance from the Virtalus’ Appliances MarketPlace.
OneKE comes in two flavors: airgapped and non-airgapped. Airgapped installation can be installed in isolated VNETs.
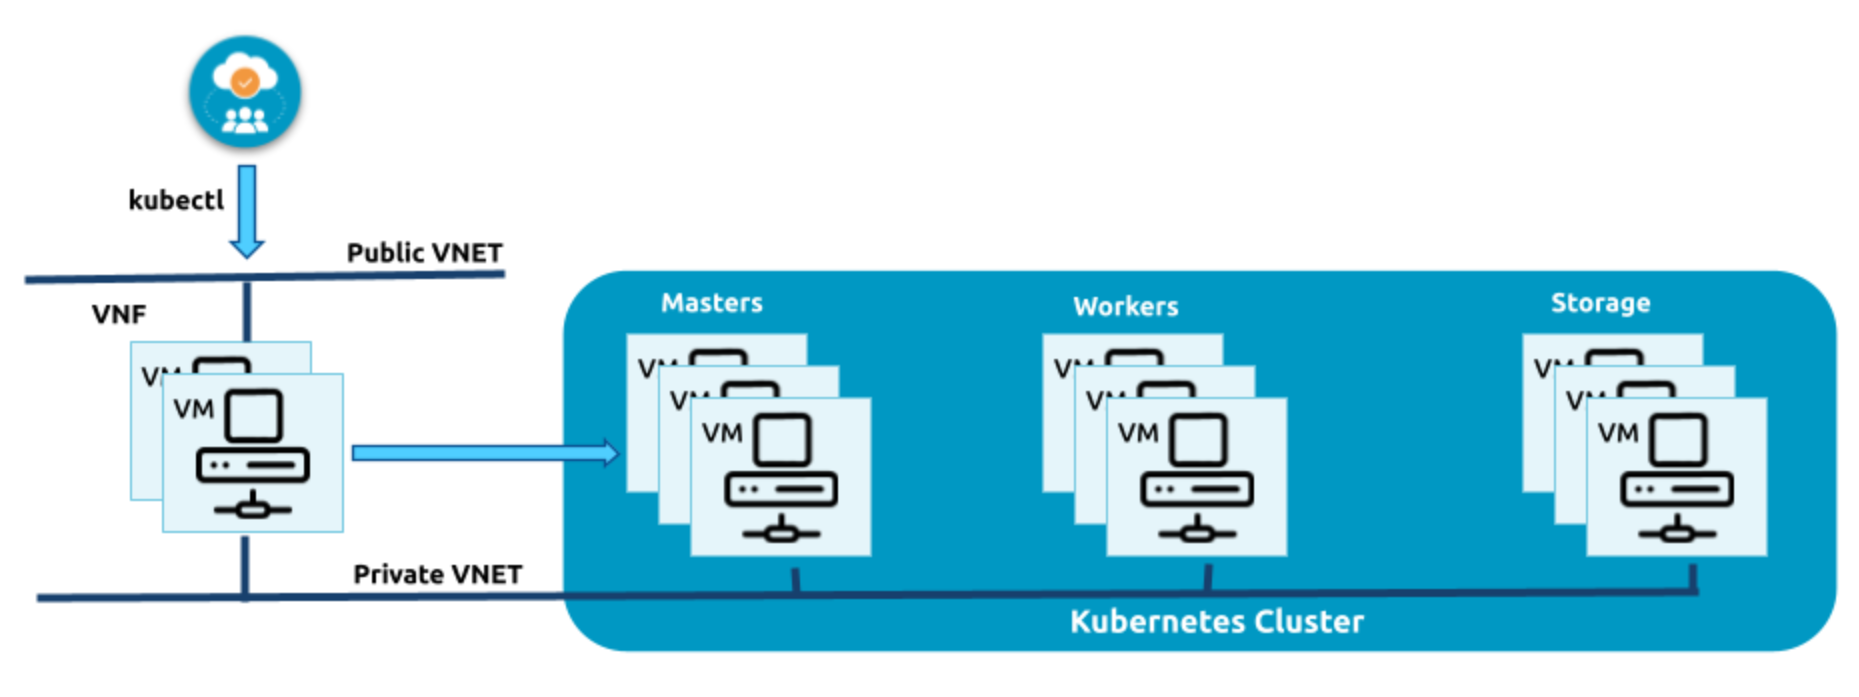
OneKE Service Roles
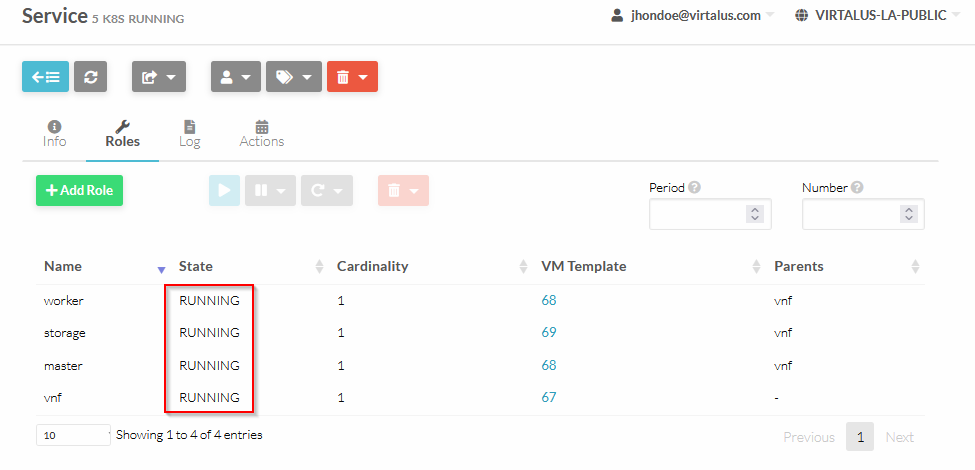
OneKE Service has four different Roles:
- VNF: Load Balancer for Control-Plane and Ingress Traffic
- Master: Control-Plane nodes
- Worker: Nodes to run application workloads
- Storage: Dedicated storage nodes for Persistent Volume replicas
VNF (Virtual Network Functions) Role
The VNF service is a multi-node system that offers Routing, NAT, and Load-Balancing capabilities to OneKE clusters. To achieve basic High Availability (HA) and failover functionality through Virtual IPs (VIPs), VNF was built on top of Keepalived. OneKE is built to operate in a dual subnet environment, where VNF facilitates NAT and Routing between public and private VNETs. Additionally, when the public VNET serves as a gateway to the public Internet, VNF enables Internet connectivity for all internal VMs.
Master Role
The master role in OneKE is tasked with carrying out various functions such as running the Control Plane, managing the etcd database, API server, controller manager, scheduler, and worker nodes. It has been designed to adhere to the High Availability principles outlined in the RKE2’s documentation. To ensure high availability, a fixed registration address is assigned to an HAProxy instance that exposes TCP port 9345 on a VNF node.
It’s also know as the control-plane and you can have more than just one by scaling up the roles.
 Note
Note
Having two control planes is a common configuration for small to medium-sized clusters, as it provides redundancy and high availability without adding too much complexity. However, having an odd number of control planes is generally recommended to avoid split-brain scenarios, where the control plane becomes partitioned into two separate groups with different views of the cluster state.Storage Role
Longhorn is the selected solution for the storage in OneKE. Longhorn is an open-source distributed storage system designed for Kubernetes. It provides persistent storage for stateful applications in Kubernetes clusters, such as databases, message queues, and other stateful workloads. Longhorn operates as a cloud-native storage solution that is tightly integrated with Kubernetes, making it easy to use and manage. It uses a combination of block-based storage and replication to provide high availability and data durability for Kubernetes workloads.
The storage nodes are tainted with node.longhorn.io/create-default-disk=true:NoSchedule, this taint is used to ensure that pods that require access to the Longhorn default disk are only scheduled on nodes that have this disk available.
The following selectors and tolerations can be used to deploy pods into storage nodes.
tolerations:
  - key: node.longhorn.io/create-default-disk
    value: "true"
    operator: Equal
    effect: NoSchedule
nodeSelector:
  node.longhorn.io/create-default-disk: "true"
Is also important to note that the reclaim policy in the Longhorn’s storage class is set to Retain as you can see in:
kind: StorageClass
apiVersion: storage.k8s.io/v1
metadata:
  name: longhorn-retain
provisioner: driver.longhorn.io
allowVolumeExpansion: true
reclaimPolicy: Retain
volumeBindingMode: Immediate
parameters:
  fsType: "ext4"
  numberOfReplicas: "3"
  staleReplicaTimeout: "2880"
  fromBackup: ""
Note
The reclaimPolicy parameter specifies what should happen to a persistent volume when the corresponding pod is deleted or terminated. In this case, setting the reclaimPolicy to Retain means that the persistent volume should not be deleted automatically when the pod is deleted or terminated. Instead, the persistent volume should be left intact so that it can be used again in the future.Each storage node expects a dedicated storage block device to be attached to the VM (/dev/vdb by default) to hold Longhorn’s replicas (mounted at /var/lib/longhorn/).
 Warning
Please note, deleting a cluster will also remove all its Longhorn replicas. Always back up your data!The default disk size available for kubernetes usage of each storage node is merely 10GB, this size can be increased easily. The easiest way is extend the vdb disk (in each Storage VM of the cluster, in case more than one Storage VM has been deployed) once deployed the cluster.
- Go to the Instances tab.
- Head to the VMs sub-tab.
- Search for the VM with the string storage and the number of the service on it’s name. On this case is
storage_0_(service_11)`. - Select the Storage menu.
- Select the
vdbdisk. - Click on the Resize option.

- Set the desired size.
- Click on the green Resize button.
- HyperCX will start the resize disk operation. Please, wait until it ends and you are done.
Worker node
By default, the worker nodes are designed to be more flexible and accommodating than other node types, such as control plane nodes or specialized nodes with specific taints or labels. This means that regular workloads can be scheduled on worker nodes without any additional configuration or customization, allowing for easy deployment and management of applications in the cluster
OneKE simple deployment scenario
On its simplest configuration, OneKE does not require any VIP definitions.
Network Diagram
Public Network
─────────────────────────────┬────────────────────────────────────
                             │ PUBLIC_IP (199.231.160.80) (ep0.eth0.vr)
                     ┌ ─ ─ ─ ┼ ─ ─ ─ ┐
                     │  OneKE vnf    │
                     │       │       │
                     │  ┌──eth0──┐   │
                     │  │        │   │
                     │  │  VM-1  │   │
                     │  │        │   │
                     │  └──eth1──┘   │
                     │       │       │
                     │    10.0.0.1   │
                     │ (ep0.eth1.vr) │
                     │       │       │
                     └ ─ ─ ─ ┼ ─ ─ ─ ┘
                             │
─────────┬───────────────────┼───────────────────┬────────────────
OneKE Private Network        │                   │
         │                   │                   │
 ┌ ─ ─ ─ ┼ ─ ─ ─ ─┐  ┌ ─ ─ ─ ┼ ─ ─ ─ ─┐  ┌ ─ ─ ─ ┼ ─ ─ ─ ─┐
 │  OneKE master  │  │  OneKE worker  │  │ OneKE storage  │
 │       │        │  │       │        │  │       │        │
 │    10.0.0.2    │  │    10.0.0.3    │  │    10.0.0.4    │
 │       │        │  │       │        │  │       │        │
 │   ┌──eth0──┐   │  │   ┌──eth0──┐   │  │   ┌──eth0──┐   │
 │   │        │   │  │   │        │   │  │   │        │   │
 │   │  VM-2  │   │  │   │  VM-3  │   │  │   │  VM-4  │   │
 │   │        │   │  │   │        │   │  │   │        │   │
 │   └────────┘   │  │   └────────┘   │  │   └────────┘   │
 └ ─ ─ ─ ─ ─ ─ ─ ─┘  └ ─ ─ ─ ─ ─ ─ ─ ─┘  └ ─ ─ ─ ─ ─ ─ ─ ─┘
Simplest deployment
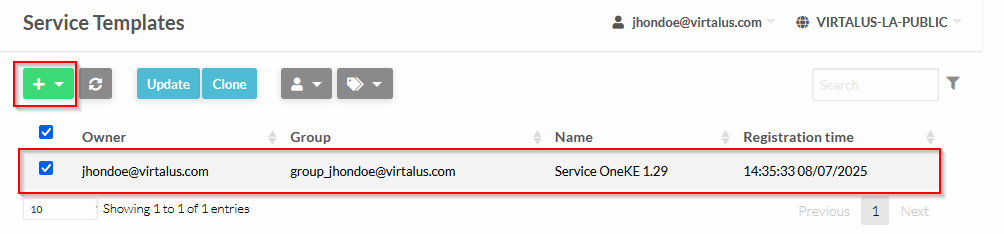
This example will use the following cloud resources, for user jhondoe@virtalus.com, group admin of group group_jhondoe@virtalus.com:

These are each component version for the appliance:
| OneKE 1.29 | |
|---|---|
| Virtual Router | 6.10.0-1-20240515 |
| RKE2 | 1.29.4+rke2r1 |
| Helm | 3.14.4 |
| Longhorn | 1.6.1 |
| MetalLB | 0.14.5 |
| Traefik | 28.0.0 |
Make sure your cloud account have your SSH public key, so every new created Linux Virtual Machine, it will have already your SSH public key added to the /root/.ssh/authorized_keys file, as long as the appliance is contextualized (all apps from our APpliance marketplace are contextualized).
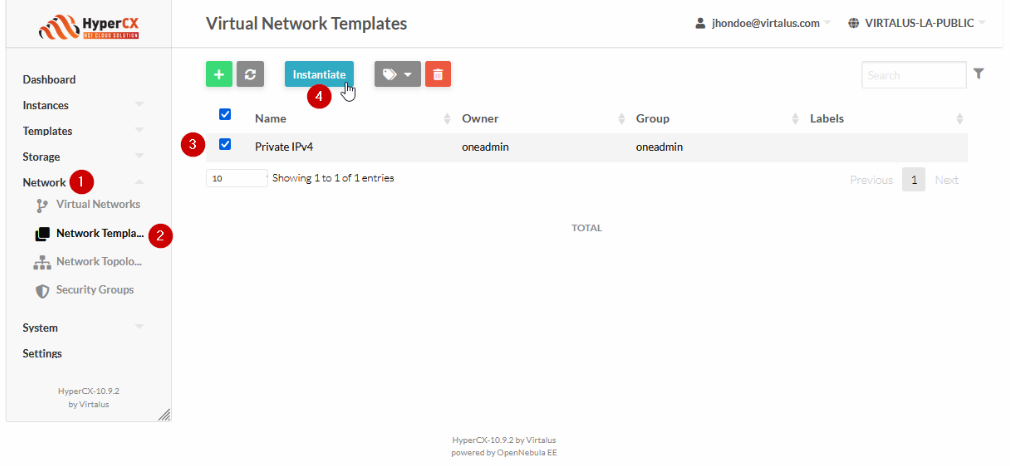
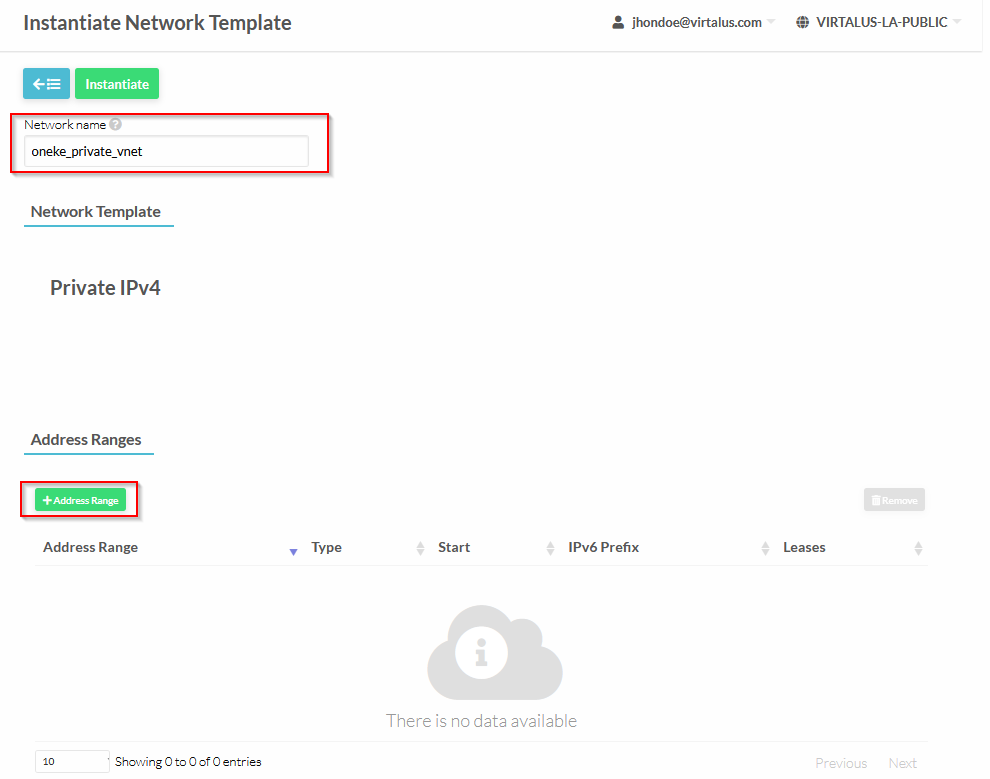
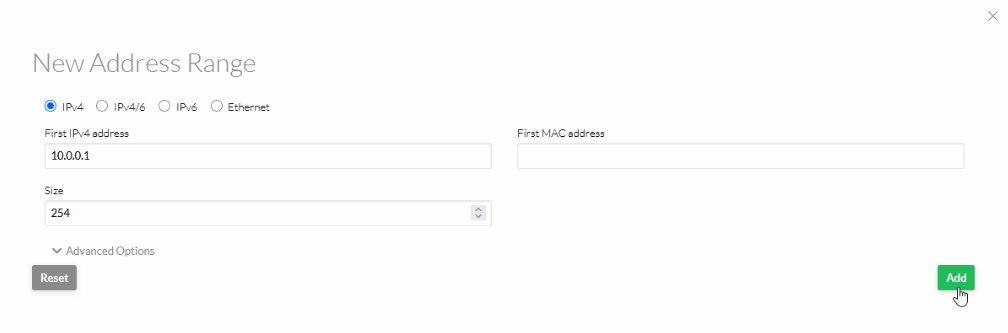
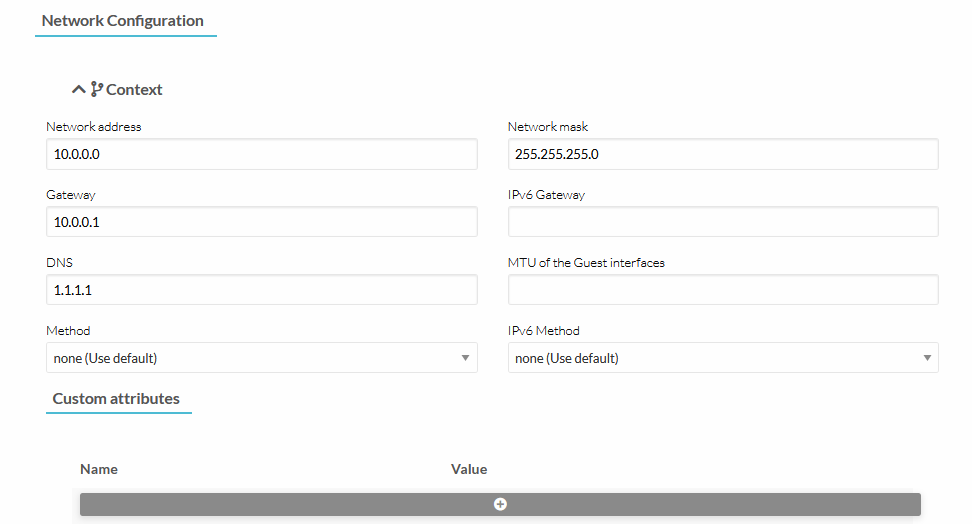
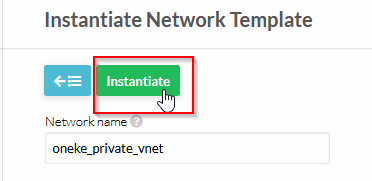
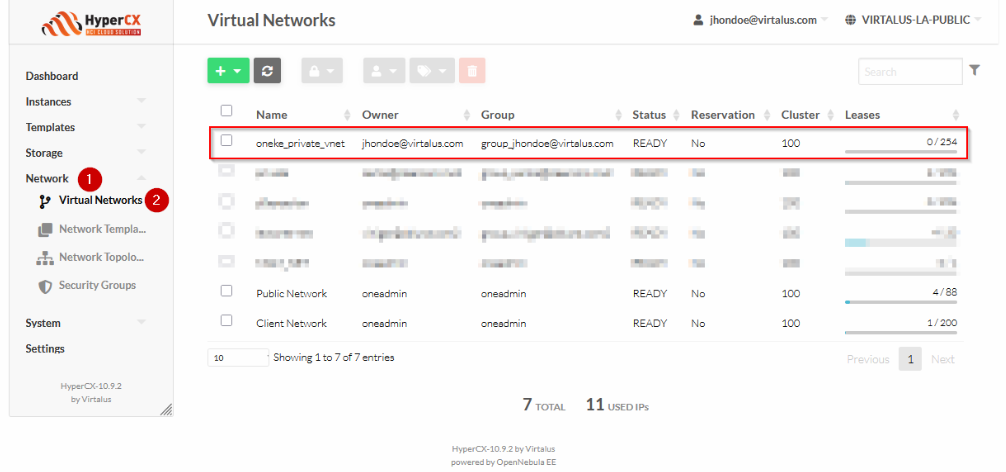
Instantiate a new private network:
Download the appliance:
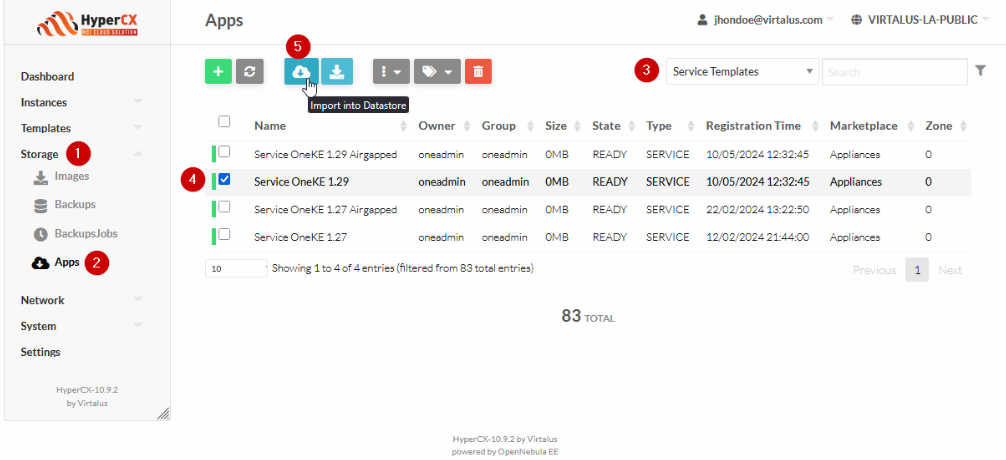
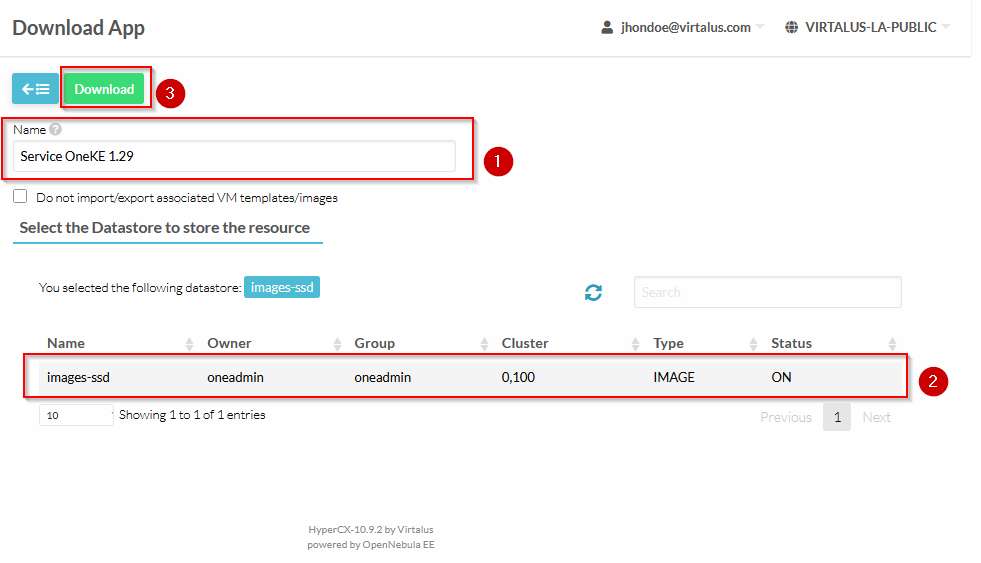
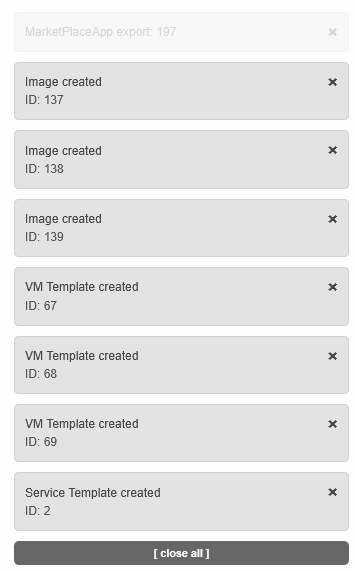
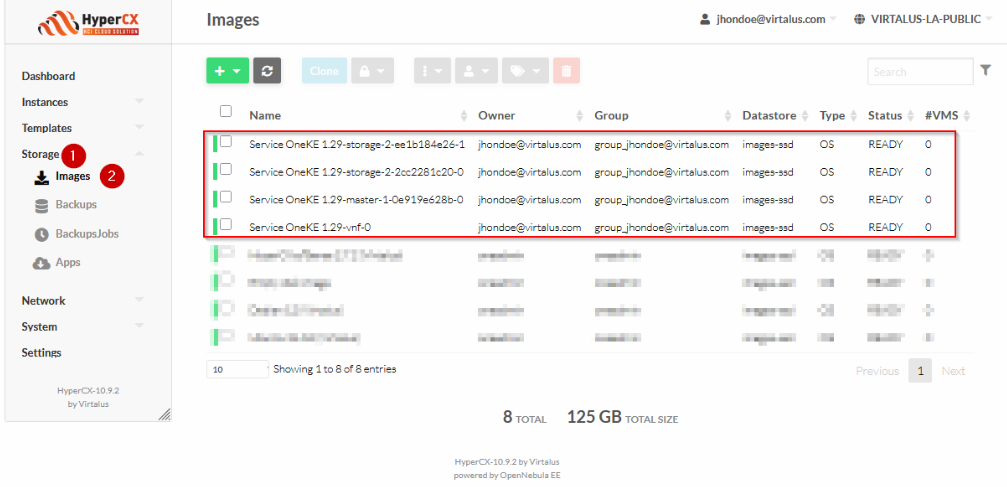
The previous action will download following images:
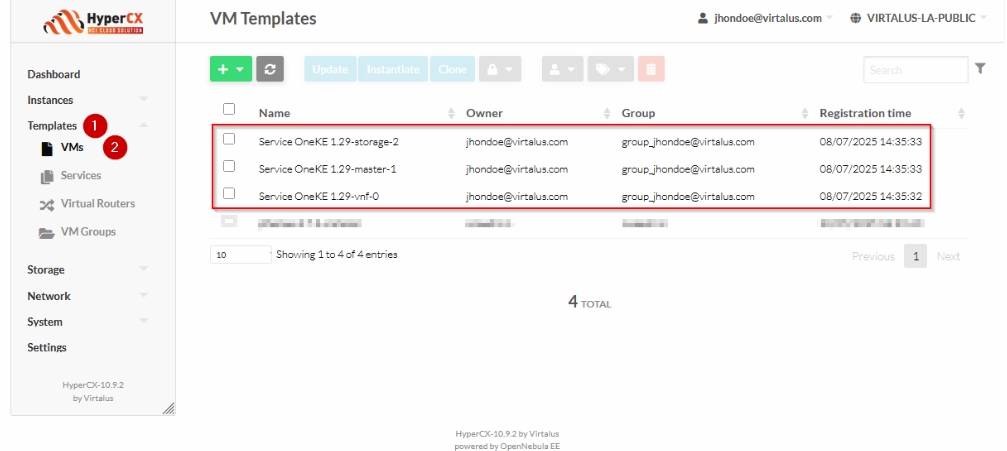
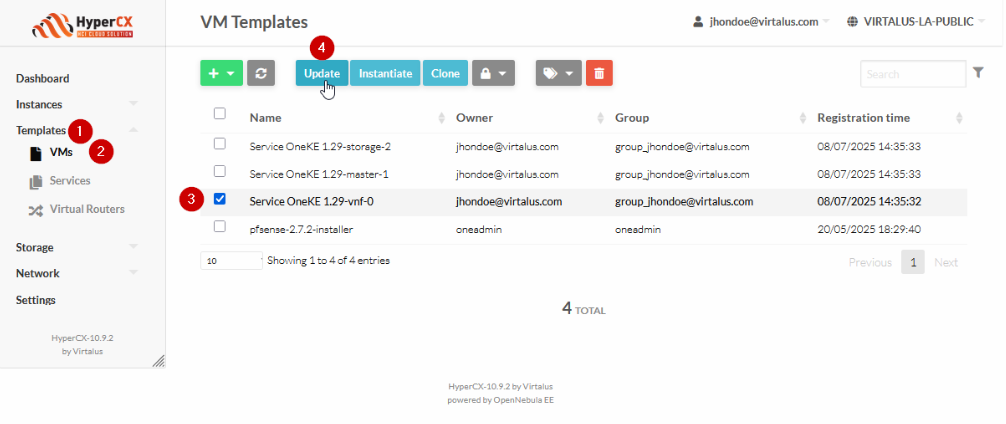
These are the VM templates of the service:
Edit VM Template for vnf:
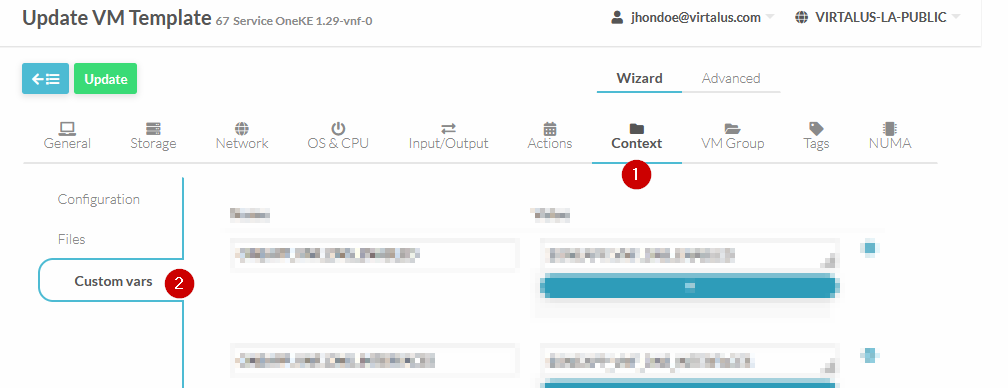
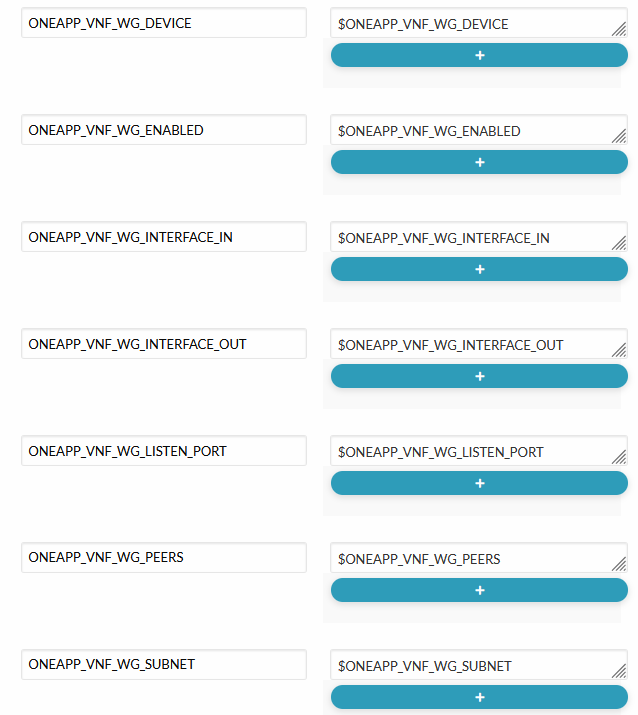
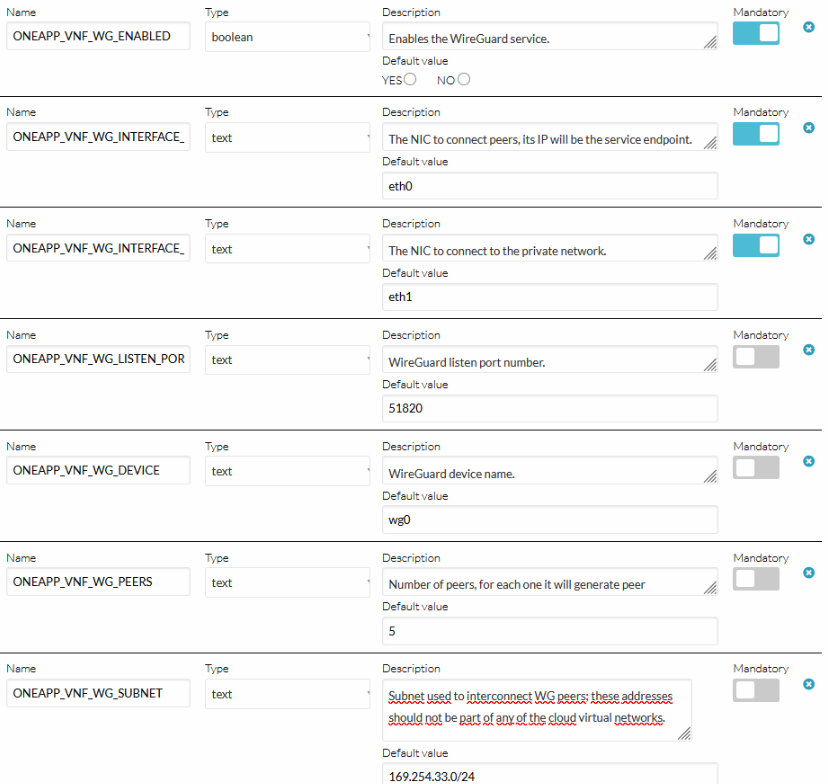
Add the following custom vars:
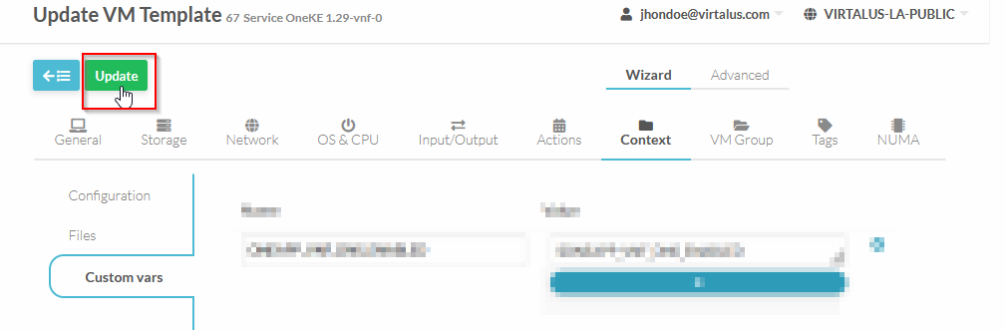
Apply changes to VM template for vnf:
This is the service template:
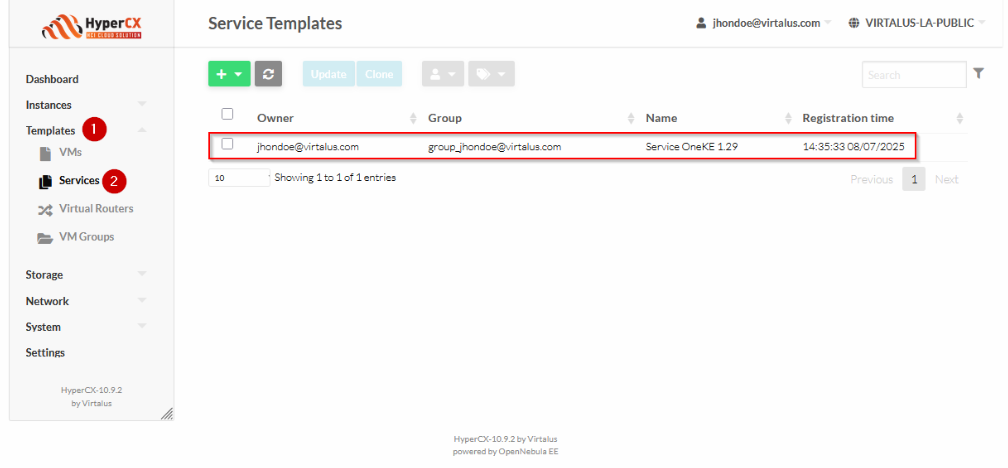
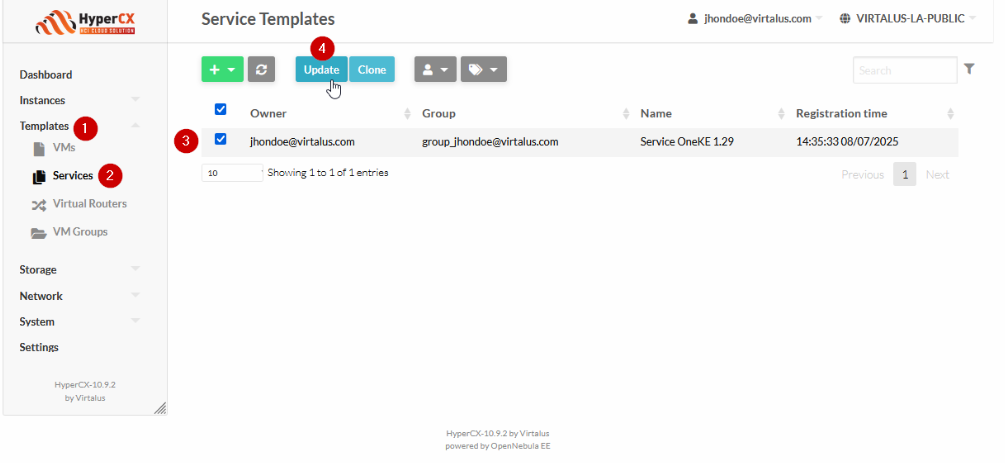
Edit the service template:
| Parameter Name | Default Value | Description |
|---|---|---|
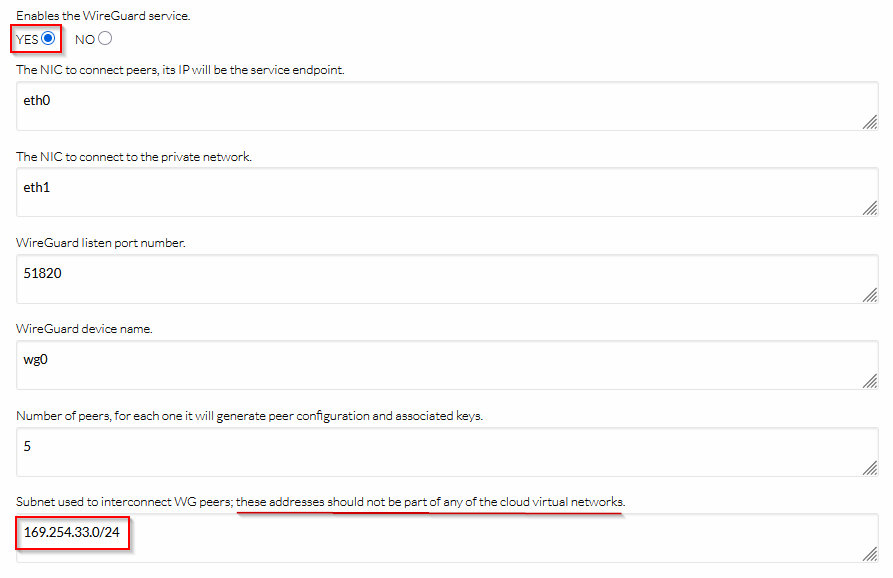
ONEAPP_VNF_WG_ENABLED | NO | Enables the service. |
ONEAPP_VNF_WG_INTERFACE_OUT | eth0 | The NIC to connect peers; its IP will be the service endpoint. |
ONEAPP_VNF_WG_INTERFACE_IN | eth1 | The NIC to connect to the private network. |
ONEAPP_VNF_WG_LISTEN_PORT | 51820 | WireGuard listen port number. |
ONEAPP_VNF_WG_DEVICE | wg0 | WireGuard device name. |
ONEAPP_VNF_WG_PEERS | 5 | Number of peers; for each one it will generate peer configuration and associated keys. |
ONEAPP_VNF_WG_SUBNET | 169.254.33.0/24 | Subnet used to interconnect WireGuard peers; these addresses should not be part of an OpenNebula virtual network. |
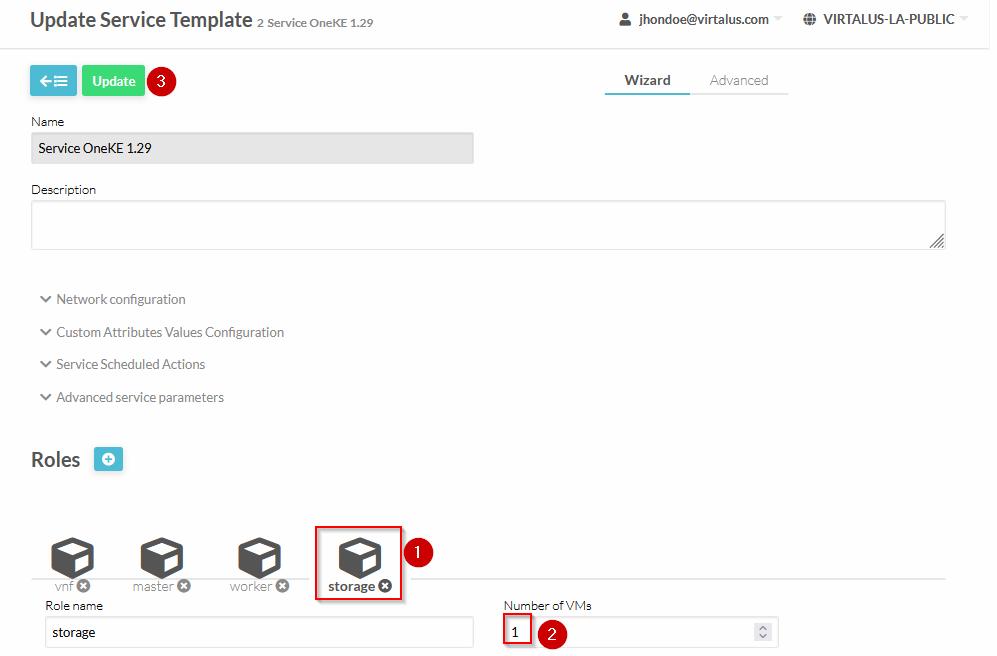
Change the cardinality for role storage and apply changes:
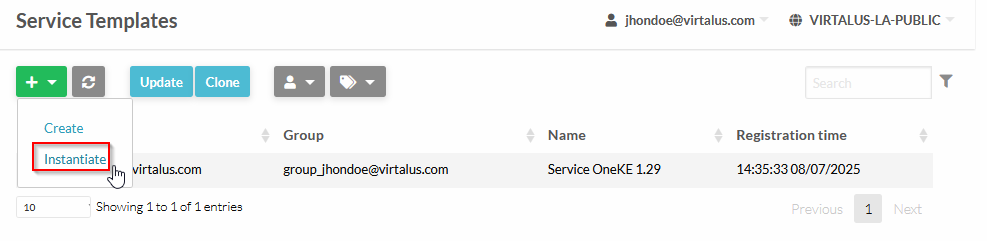
Now that we have all networks that will be using for this deployment, and the images and templates, lets instantiate the appliance:
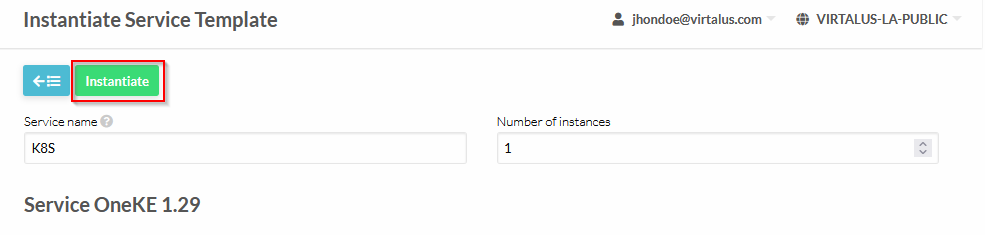
Click on “Instantiate”:
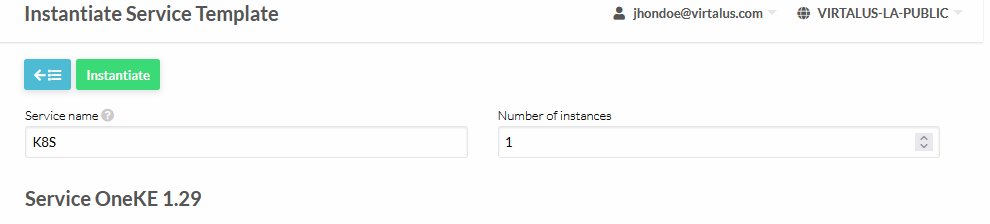
Define Service Name and number of instances (set 1):
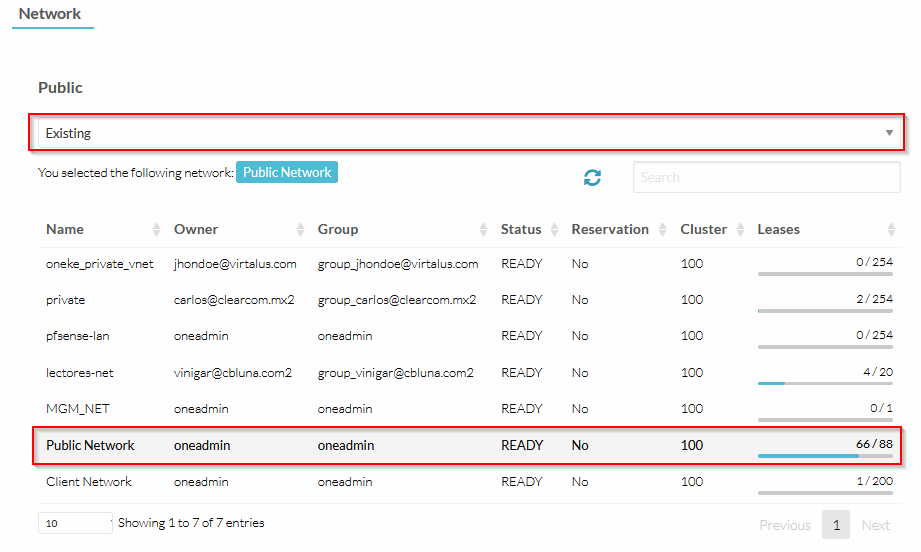
Select the VNF eth0 network (ussually the “Public Network”):
For the VNF eth1 network, select the created private VNET for this deployment. Make sure that the IP of the GW of this network is available for use, because the VNF needs this IP, in order to act as the GW of the K8S servers:
Follow the configuration of the screenshot:
Follow the configuration of the screenshot (the MetalLB IPrange should be the private network for the K8S servers):

Follow the configuration of the screenshot:
Follow the configuration of the screenshot:
Follow the configuration of the screenshot (WireGuard VPN is not mandatory, but recommended). The network of the WireGuard VPN should not be one of the VNETs of the cloud:
Finally, complete the instantiation of the service:
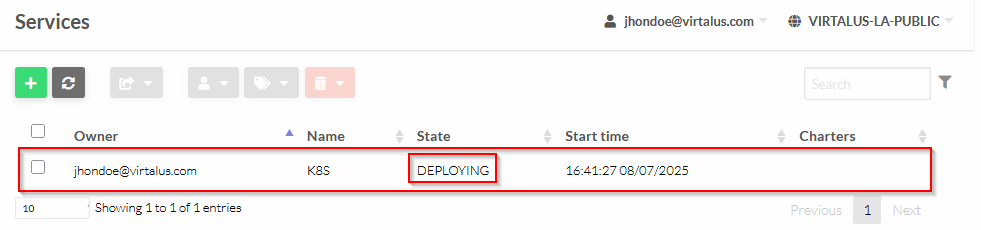
Right now the service will be in DEPLOYING state:
After a couple of minutes, the service will be ready:
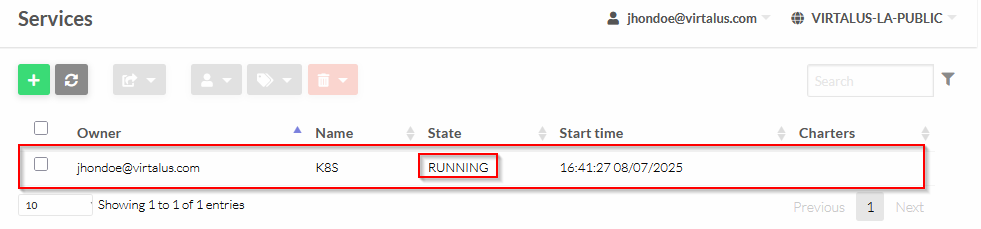
You may check the roles of the service, all should be in RUNNING state:
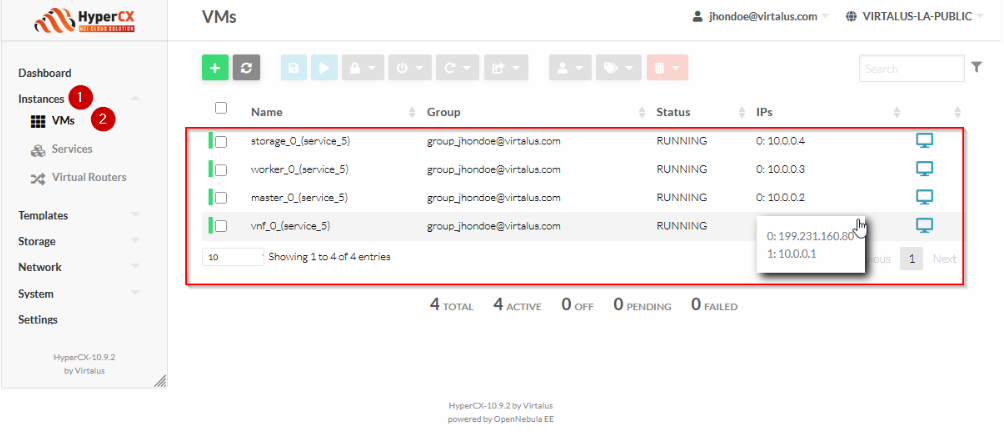
The service created a number of VMs, that you may check on this tab:
Access to the master node (you should have added your SSH public keys to each VM of the K8S cluster, through contextualization:
ssh -J root@199.231.160.80 root@10.0.0.2
Get nodes information:
kubectl get nodes -o wide
The output is as follow:
NAME                STATUS   ROLES                       AGE     VERSION          INTERNAL-IP   EXTERNAL-IP   OS-IMAGE             KERNEL-VERSION       CONTAINER-RUNTIME
oneke-ip-10-0-0-2   Ready    control-plane,etcd,master   5m8s    v1.29.4+rke2r1   10.0.0.2      <none>        Ubuntu 22.04.4 LTS   5.15.0-105-generic   containerd://1.7.11-k3s2
oneke-ip-10-0-0-3   Ready    <none>                      3m42s   v1.29.4+rke2r1   10.0.0.3      <none>        Ubuntu 22.04.4 LTS   5.15.0-105-generic   containerd://1.7.11-k3s2
oneke-ip-10-0-0-4   Ready    <none>                      3m42s   v1.29.4+rke2r1   10.0.0.4      <none>        Ubuntu 22.04.4 LTS   5.15.0-105-generic   containerd://1.7.11-k3s2
Remote access to K8S cluster
On HyperCX Frontend
Access to the vnf VM info:

There are 5 peers configuration for WireGuard from PEER0 to PEER4:
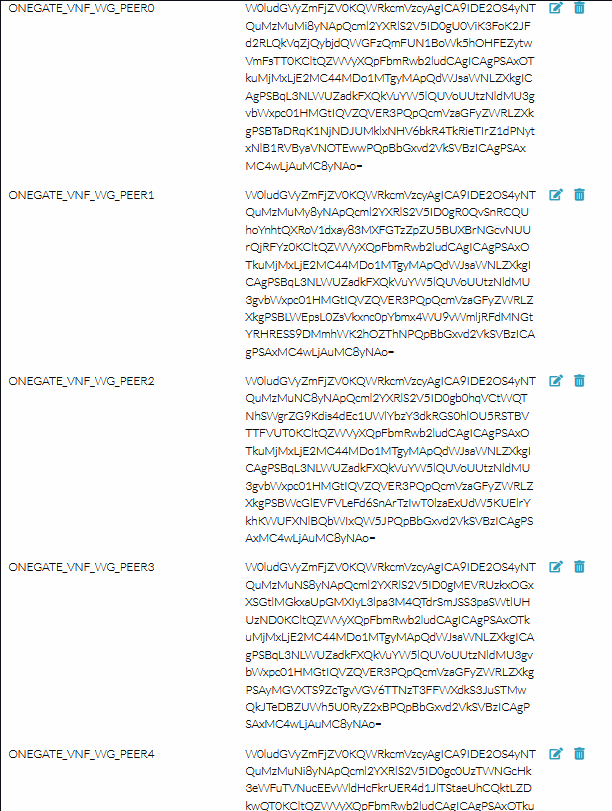
Those config files are encoded in base64d, so if you want to make use of one of this, you need to decode it:
echo "W0ludGVyZmFjZV0KQWRkcmVzcyAgICA9IDE2OS4yNTQuMzMuMi8yNApQcml2YXRlS2V5ID0gU0ViK3FoK2JFd2RLQkVqZjQybjdQWGFzQmFUN1BoWk5hOHFEZytwVmFsTT0KCltQZWVyXQpFbmRwb2ludCAgICAgPSAxO
TkuMjMxLjE2MC44MDo1MTgyMApQdWJsaWNLZXkgICAgPSBqL3NLWUZadkFXQkVuYW5lQUVoUUtzNldMU3gvbWxpc01HMGtIQVZQVER3PQpQcmVzaGFyZWRLZXkgPSBTaDRqK1NjNDJUMklxNHV6bkR4TkRieTIrZ1dPNytxNlB1RVByaVNOTEw
wPQpBbGxvd2VkSVBzICAgPSAxMC4wLjAuMC8yNAo=" | base64 -d
This is an example output:
[Interface]
Address    = 169.254.33.2/24
PrivateKey = SEb+qh+bEwdKBEjf42n7PXasBaT7PhZNa8qDg+pValM=

[Peer]
Endpoint     = 199.231.160.80:51820
PublicKey    = j/sKYFZvAWBEnaneAEhQKs6WLSx/mlisMG0kHAVPTDw=
PresharedKey = Sh4j+Sc42T2Iq4uznDxNDby2+gWO7+q6PuEPriSNLL0=
AllowedIPs   = 10.0.0.0/24
Add this coniguration to your client endpoint, and connect to the server. Once connected you will be able to access to the K8S servers network 10.0.0.0/24.
On your Linux (Ubuntu/Debian) endpoint
Install wireguard:
apt update
apt install -y wireguard
Create the configuration file for wg0:
cat <<\EOF > /etc/wireguard/wg0.conf
[Interface]
Address    = 169.254.33.2/24
PrivateKey = SEb+qh+bEwdKBEjf42n7PXasBaT7PhZNa8qDg+pValM=

[Peer]
Endpoint     = 199.231.160.80:51820
PublicKey    = j/sKYFZvAWBEnaneAEhQKs6WLSx/mlisMG0kHAVPTDw=
PresharedKey = Sh4j+Sc42T2Iq4uznDxNDby2+gWO7+q6PuEPriSNLL0=
AllowedIPs   = 10.0.0.0/24
EOF
Create the interface and start connection through the VPN:
wg-quick up wg0
Example output:
[#] ip link add wg1 type wireguard
[#] wg setconf wg1 /dev/fd/63
[#] ip -4 address add 169.254.33.2/24 dev wg0
[#] ip link set mtu 1420 up dev wg0
[#] ip -4 route add 10.0.0.0/24 dev wg0
Check the IP of the wg0 interface:
ip a show wg0
Example output:
34: wg0: <POINTOPOINT,NOARP,UP,LOWER_UP> mtu 1420 qdisc noqueue state UNKNOWN group default qlen 1000
    link/none
    inet 169.254.33.2/24 scope global wg0
       valid_lft forever preferred_lft forever
Check the new routes:
ip r show dev wg0
Example output:
10.0.0.0/24 scope link
169.254.33.0/24 proto kernel scope link src 169.254.33.2
Congratulations! Arrived to this point, you have a functional K8S cluster with remote access configured trhough a secured channel (WireGuard VPN).
You should be able now to access directly to the K8S servers network 10.0.0.0/24.
Accessing the Longhorn Web UI [OPTIONAL]
The installed Traefik is exposed as NodePort on ports 32080 (for HTTP) and 32443 (for HTTPS), the HAProxy works as a TCP proxy to the Traefik of worker node. It is required an ingress for the Longhorn UI, to expose it to the public network.
On master node
Check Longhorn Web UI ClusterIP address and port with:
kubectl -n longhorn-system get svc longhorn-frontend
Example output:
NAME                TYPE        CLUSTER-IP   EXTERNAL-IP   PORT(S)   AGE
longhorn-frontend   ClusterIP   10.43.6.31   <none>        80/TCP    12m
Is listening at port 80/tcp on ClusterIP 10.43.6.31.
Longhorn Web UI service can be exposed through the external VNF IP, by creating an IngressRoute object. To do so, create the following Kubernetes manifest in the master node:
cat <<\EOF > /var/tmp/ingressroute_longhorn-frontend.yml
---
apiVersion: traefik.io/v1alpha1
kind: Middleware
metadata:
  name: redirect-longhorn-frontend
  namespace: longhorn-system
spec:
  redirectRegex:
    regex: ^(.*)/longhorn$
    replacement: $1/longhorn/
    permanent: false
---
apiVersion: traefik.io/v1alpha1
kind: Middleware
metadata:
  name: rewrite-longhorn-frontend
  namespace: longhorn-system
spec:
  replacePathRegex:
    regex: ^/longhorn/(.*)$
    replacement: /$1
---
apiVersion: traefik.io/v1alpha1
kind: IngressRoute
metadata:
  name: longhorn-frontend
  namespace: longhorn-system
spec:
  entryPoints: [web]
  routes:
    - kind: Rule
      match: PathPrefix(`/longhorn`)
      middlewares:
        - name: redirect-longhorn-frontend
        - name: rewrite-longhorn-frontend
      services:
        - kind: Service
          name: longhorn-frontend
          port: 80
          scheme: http
EOF
Apply the manifest with:
kubectl apply -f /var/tmp/ingressroute_longhorn-frontend.yml
Example output:
middleware.traefik.io/redirect-longhorn-frontend created
middleware.traefik.io/rewrite-longhorn-frontend created
ingressroute.traefik.io/longhorn-frontend created
The Longhorn Web UI will be accessible using a web browser through HAProxy and Traefik:
http://<YOUR_PUBLIC_IP>/longhorn
http://199.231.160.80/longhorn
Securing Longhorn UI with HTTPS and basic authentication
By default, Longhorn UI is exposed for HTTP. The idea is to add a reverse proxy on the vnf node with HTTPS and basic authentication for Longhorn UI.
On vnf node
Make sure the following packages are installed:
apk update
apk add nano nginx openssl apache2-utils
Create a selfsigned certificate and private key:
IP_PUB=$(ip addr show eth0 | awk '/inet / {print $2}' | cut -d/ -f1)
mkdir -p /etc/nginx/ssl/private /etc/nginx/ssl/certs
openssl req -x509 -nodes -days 3650 -newkey rsa:2048 \
  -keyout /etc/nginx/ssl/private/selfsigned.key \
  -out /etc/nginx/ssl/certs/selfsigned.crt \
  -subj "/CN=${IP_PUB}" \
  -addext "subjectAltName = IP:${IP_PUB}"
Create basic authentication:
htpasswd -c /etc/nginx/.htpasswd admin-user
Define your password:
New password: StrongPass <-- Your Password goes here
Re-type new password: StrongPass <-- Your Password goes here
Example output:
Adding password for user admin-user
Disable nginx default block configuration:
mv /etc/nginx/http.d/default.conf /etc/nginx/http.d/default.conf.disabled
Create nginx reverse proxy cofiguration for longhorn:
cat <<\EOF > /etc/nginx/http.d/longhorn.conf
server {
    listen 7443 ssl;

    server_name _;

    ssl_certificate     /etc/nginx/ssl/certs/selfsigned.crt;
    ssl_certificate_key /etc/nginx/ssl/private/selfsigned.key;

    ssl_protocols TLSv1.3;
    ssl_prefer_server_ciphers on;

    location / {
        proxy_pass http://127.0.0.1:80;

        auth_basic "Protected";
        auth_basic_user_file /etc/nginx/.htpasswd;

        proxy_set_header Host $host;
        proxy_set_header X-Real-IP $remote_addr;
        proxy_set_header X-Forwarded-For $proxy_add_x_forwarded_for;
        proxy_set_header X-Forwarded-Proto $scheme;
    }
}
EOF
Update the config with the public IP:
IP_PUB=$(ip addr show eth0 | awk '/inet / {print $2}' | cut -d/ -f1)
sed -i "s|proxy_pass http://127\.0\.0\.1;|proxy_pass http://$IP_PUB;|" /etc/nginx/http.d/longhorn.conf
Check nginx configuration:
nginx -t
Example output:
nginx: the configuration file /etc/nginx/nginx.conf syntax is ok
nginx: configuration file /etc/nginx/nginx.conf test is successful
Add nginx service at startup and start it:
rc-update add nginx
rc-service nginx start
Example output:
 * Caching service dependencies ...                                                                                 [ ok ]
 * Starting nginx ...                                                                                               [ ok ]
Access to the Longhorn UI trhough HTTPS and basic auth:
https://<YOUR_PUBLIC_IP>:7443/longhorn/
https://199.231.160.80:7443/longhorn/
Accept the self-signed certificate and set your credentials.
Deploying Kubernetes Dashboard [OPTIONAL]
The Kubernetes Dashboard is an official web-based UI for Kubernetes clusters. It offers a graphical interface for managing and monitoring your Kubernetes resources and applications. It allows users to deploy applications, manage cluster resources (like deployments, pods, services), and troubleshoot issues visually.
On vnf node
Add a new frontend and backend section for Kubernetes Dashboard LB:
cat <<\EOF > /etc/haproxy/servers2.cfg
frontend lb4_8443
    mode tcp
    bind 199.231.160.80:8443
    default_backend lb4_8443

backend lb4_8443
    mode tcp
    balance roundrobin
    option tcp-check
    server lb4_10.0.0.3_32767 10.0.0.3:32767 check observe layer4 error-limit 50 on-error mark-down
EOF
Restart the service:
rc-service one-haproxy restart
Example output:
 * Starting haproxy ...                                                                                 [ ok ]
 * Starting one-haproxy ...                                                                             [ ok ]
The problem with this modification, is that you will have to manually update this file, if you change the LB ports from the contextualization or scale your K8S cluster, in order to have all workers configured for the load balancing.
On master node
Add the repository:
helm repo add kubernetes-dashboard https://kubernetes.github.io/dashboard
Example output:
"kubernetes-dashboard" has been added to your repositories
Update repo:
helm repo update
Deploy Kubernetes Dashboard (chart version 7.5.0 compatible with RKE2 1.29) with Helm and without HTTPS support:
helm upgrade --install kubernetes-dashboard kubernetes-dashboard/kubernetes-dashboard \
  --version 7.5.0 \
  --namespace kubernetes-dashboard \
  --create-namespace \
  --set protocolHttps=true \
  --set kong.enabled=true \
  --set service.type=ClusterIP
Example output:
Release "kubernetes-dashboard" does not exist. Installing it now.
NAME: kubernetes-dashboard
LAST DEPLOYED: Thu Jul 10 23:02:36 2025
NAMESPACE: kubernetes-dashboard
STATUS: deployed
REVISION: 1
TEST SUITE: None
NOTES:
*************************************************************************************************
*** PLEASE BE PATIENT: Kubernetes Dashboard may need a few minutes to get up and become ready ***
*************************************************************************************************

Congratulations! You have just installed Kubernetes Dashboard in your cluster.

To access Dashboard run:
  kubectl -n kubernetes-dashboard port-forward svc/kubernetes-dashboard-kong-proxy 8443:443

NOTE: In case port-forward command does not work, make sure that kong service name is correct.
      Check the services in Kubernetes Dashboard namespace using:
        kubectl -n kubernetes-dashboard get svc

Dashboard will be available at:
  https://localhost:8443
Check the services in Kubernetes Dashboard namespace:
kubectl -n kubernetes-dashboard get svc
Example output:
NAME                                   TYPE        CLUSTER-IP      EXTERNAL-IP   PORT(S)                         AGE
kubernetes-dashboard-api               ClusterIP   10.43.71.92     <none>        8000/TCP                        41s
kubernetes-dashboard-auth              ClusterIP   10.43.89.144    <none>        8000/TCP                        41s
kubernetes-dashboard-kong-manager      NodePort    10.43.226.183   <none>        8002:30336/TCP,8445:31837/TCP   41s
kubernetes-dashboard-kong-proxy        ClusterIP   10.43.25.56     <none>        443/TCP                         41s
kubernetes-dashboard-metrics-scraper   ClusterIP   10.43.4.41      <none>        8000/TCP                        41s
kubernetes-dashboard-web               ClusterIP   10.43.10.78     <none>        8000/TCP                        41s
Change service kubernetes-dashboard-kong-proxy from ClusterIP to NodePort:
kubectl -n kubernetes-dashboard patch svc kubernetes-dashboard-kong-proxy \
  -p '{"spec": {"type": "NodePort", "ports": [{"port": 443, "targetPort": 8443, "nodePort": 32767}]}}'
Example output:
service/kubernetes-dashboard-kong-proxy patched
Check if teh service is running the new NodePort:
kubectl -n kubernetes-dashboard get svc kubernetes-dashboard-kong-proxy
Example output:
NAME                              TYPE       CLUSTER-IP    EXTERNAL-IP   PORT(S)         AGE
kubernetes-dashboard-kong-proxy   NodePort   10.43.25.56   <none>        443:32767/TCP   116s
The Kubernetes Dashboard will be accessible using a web browser through HAProxy and NodePort:
https://<YOUR_PUBLIC_IP>:8443
https://199.231.160.80:8443
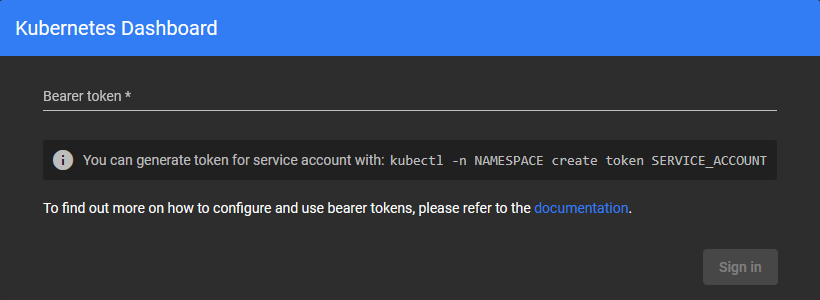
It will ask for a bearer token:
Create a new ServiceAccount for the given namespace:
kubectl -n kubernetes-dashboard create serviceaccount admin-user
Example output:
serviceaccount/admin-user created
Assigning admin rights to the new ServiceAccount:
kubectl create clusterrolebinding admin-user-binding \
  --clusterrole=cluster-admin \
  --serviceaccount=kubernetes-dashboard:admin-user
Example output:
clusterrolebinding.rbac.authorization.k8s.io/admin-user-binding created
Create token with no expiration, linked to the created ServiceAccount:
cat <<EOF | kubectl apply -f -
apiVersion: v1
kind: Secret
metadata:
  name: admin-user-secret
  namespace: kubernetes-dashboard
  annotations:
    kubernetes.io/service-account.name: "admin-user"
type: kubernetes.io/service-account-token
EOF
Example output:
secret/admin-user-secret created
Get the token:
kubectl -n kubernetes-dashboard get secret admin-user-secret -o go-template='{{.data.token | base64decode}}'
Example output:
eyJhbGciOiJSUzI1NiIsImtpZCI6IndvZ0w1dFA1TE51UzRwZjdReUlIa3BURzVKWHFvYW85bUFMMS1ieGR3VDQifQ.eyJpc3MiOiJrdWJlcm5ldGVzL3NlcnZpY2VhY2NvdW50Iiwia3ViZXJuZXRlcy5pby9zZXJ2aWNlYWNjb3VudC9uYW1lc3BhY2UiOiJrdWJlcm5ldGVzLWRhc2hib2FyZCIsImt1YmVybmV0ZXMuaW8vc2VydmljZWFjY291bnQvc2VjcmV0Lm5hbWUiOiJhZG1pbi11c2VyLXNlY3JldCIsImt1YmVybmV0ZXMuaW8vc2VydmljZWFjY291bnQvc2VydmljZS1hY2NvdW50Lm5hbWUiOiJhZG1pbi11c2VyIiwia3ViZXJuZXRlcy5pby9zZXJ2aWNlYWNjb3VudC9zZXJ2aWNlLWFjY291bnQudWlkIjoiYWZmNDhkZjktNzNlZC00NDM1LThjYmMtMTk4NGQxNWYwNzExIiwic3ViIjoic3lzdGVtOnNlcnZpY2VhY2NvdW50Omt1YmVybmV0ZXMtZGFzaGJvYXJkOmFkbWluLXVzZXIifQ.Ao_HcWVEeLbtjmgPhfY7Dp7PtyeDwVCDrE8d9rjA4BrLNxGk8C7cXPj2TIyWV6aPGLPDpROiRKwm8JQQc_4mpGbl7DfxWL2ifhj1B4DF2-aYY0KAspmi3Po6tlMQe4Ony2BhINNkEhIHoDWCCHkqWI13zPqjkV_oyl2VYd7Xyq2XAMhxJldB6aorkriedqWJYgVCbUsraAytMAF0RrmJR-FMeRN42muuq9RFIrT4KawB_wNvZhXFTAiJF2Zs1ogEke5OGR9poNaZ9-x8_HHa0PQlvrQnGycDrJv0qkoM7O7D8fd8iGnszo2Svnp8nZ3hmbycgn2qw19vCaUm5m4JpQ
You may complete the login with the permanent generated token:
Enabling HAProxy Stats [OPTIONAL]
On the vnf node
Enabling monitoring
cat <<\EOF > /etc/haproxy/stats.cfg
# HAProxy monitoring
listen stats
        bind 127.0.0.1:10080
        mode http
        stats enable
        stats uri /
        stats refresh 10s
EOF
Apply changes:
rc-service one-haproxy restart
Example output:
 * Stopping one-haproxy ...                                                                             [ ok ]
 * Stopping haproxy ...                                                                                 [ ok ]
 * Starting haproxy ...                                                                                 [ ok ]
 * Starting one-haproxy ...                                                                             [ ok ]
Create an NGINX reverse proxy config file for HAProxy Stats:
cat <<\EOF > /etc/nginx/http.d/haproxy-stats.conf
server {
    listen 10443 ssl;

    server_name _;

    ssl_certificate     /etc/nginx/ssl/certs/selfsigned.crt;
    ssl_certificate_key /etc/nginx/ssl/private/selfsigned.key;

    ssl_protocols TLSv1.3;
    ssl_prefer_server_ciphers on;

    location / {
        proxy_pass http://127.0.0.1:10080;

        auth_basic "Protected";
        auth_basic_user_file /etc/nginx/.htpasswd;

        proxy_set_header Host $host;
        proxy_set_header X-Real-IP $remote_addr;
        proxy_set_header X-Forwarded-For $proxy_add_x_forwarded_for;
        proxy_set_header X-Forwarded-Proto $scheme;
    }
}
EOF
Update the config with the public IP:
IP_PUB=$(ip addr show eth0 | awk '/inet / {print $2}' | cut -d/ -f1)
sed -i "s|proxy_pass http://127\.0\.0\.1;|proxy_pass http://$IP_PUB:1080;|" /etc/nginx/http.d/haproxy-stats.conf
Check nginx configuration:
nginx -t
Example output:
nginx: the configuration file /etc/nginx/nginx.conf syntax is ok
nginx: configuration file /etc/nginx/nginx.conf test is successful
Restart service:
rc-service nginx restart
Example output:
 * Stopping nginx ...                                                                             [ ok ]
 * Starting nginx ...                                                                             [ ok ]
Access to the Longhorn UI trhough HTTPS and basic auth:
https://<YOUR_PUBLIC_IP>:10443/
https://199.231.160.80:10443/
Accept the self-signed certificate and set your credentials.
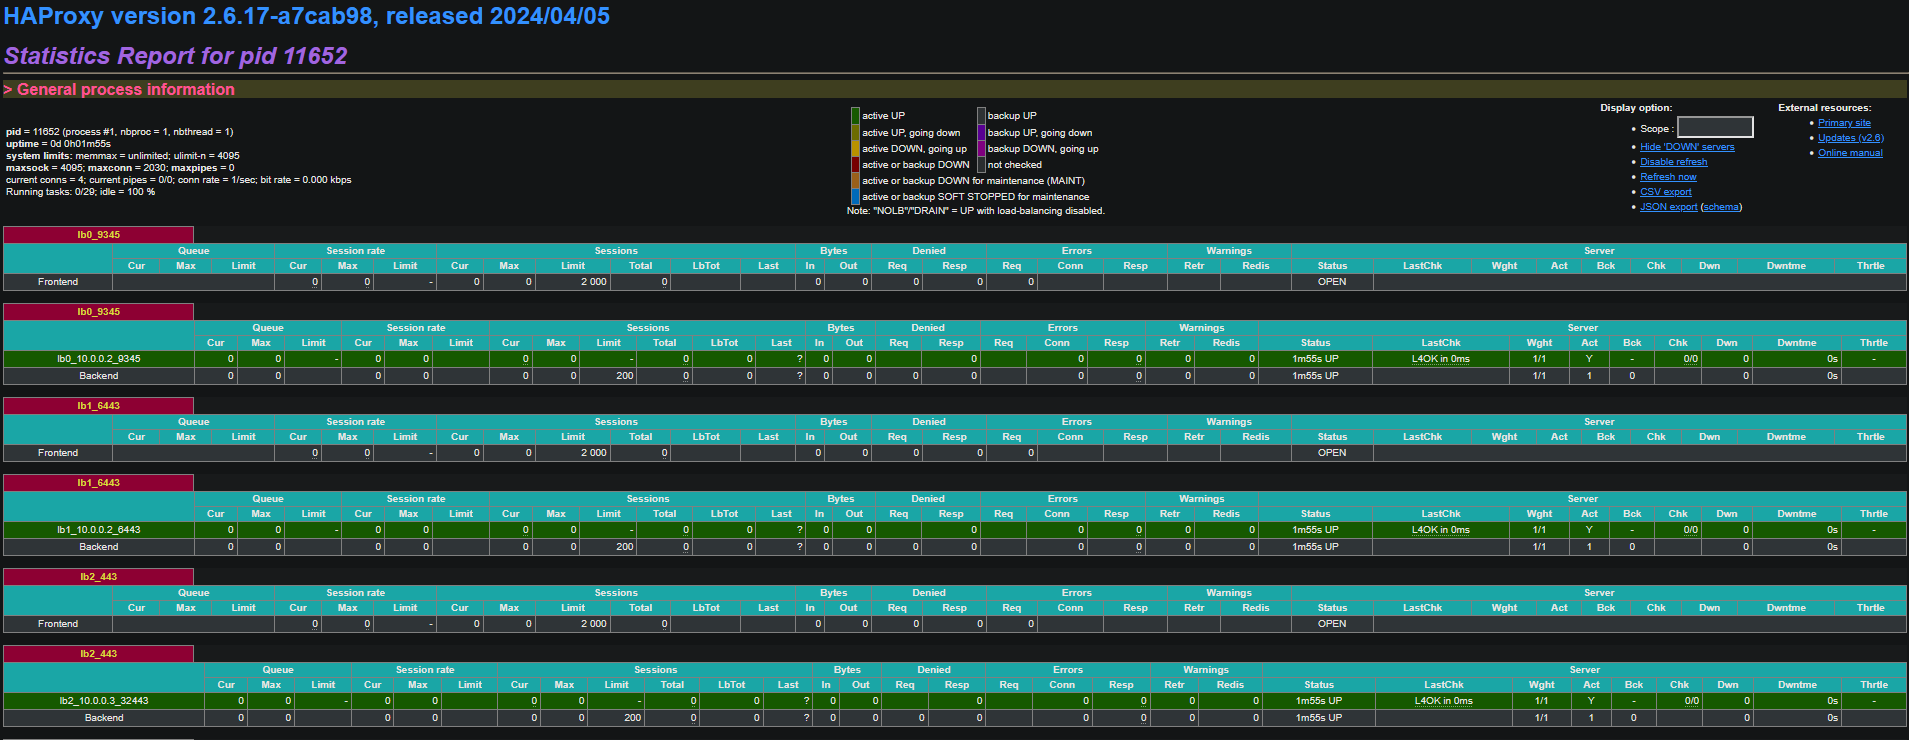
HAProxy Stats dashboard is available now through a secured channel:
Iptables Hardening [OPTIONAL]
By default, vnf have iptables configured with no other rules than the MASQUERADE of the KS8 servers network. As this deployment is using a public IP, the vnf node should be prepared to handle the outside network from unautorized accesses. Shield your KS8 cluster with these rules.
On the vnf node
cat << EOF > /etc/iptables/iptables.rules
#--------
# FILTER
#--------
*filter
:INPUT DROP [0:0]
:FORWARD DROP [0:0]
:OUTPUT ACCEPT [0:0]
#---------- BEGIN INPUT RULES
# Accept all from these sources
-A INPUT -i lo -j ACCEPT
-A INPUT -i wg0 -j ACCEPT
# Drop INVALID packages
-A INPUT -i eth0 -m conntrack --ctstate INVALID -j DROP
# Accept RELATED and ESTABLISHED connections
-A INPUT -m conntrack --ctstate RELATED,ESTABLISHED -j ACCEPT
# SSH
-A INPUT -p tcp -m tcp --dport 22 -j ACCEPT
# DNS
-A INPUT -i eth0 -p tcp -m tcp --dport 53 -j ACCEPT
-A INPUT -i eth0 -p udp -m udp --dport 53 -j ACCEPT
# WIREGUARD
-A INPUT -i eth0 -p udp -m udp --dport 51820 -j ACCEPT
# HTTP, HTTPS, LONGHORN-UI, KUBERNETES-DASHBOARD, HAPROXY-STATS
-A INPUT -p tcp -m tcp -m multiport --dports 80,443,7443,8443,10443 -j ACCEPT
# ICMP
-A INPUT -p icmp -j ACCEPT
# VRRP
-A INPUT -p 112 -j ACCEPT
#---------- ENDING INPUT RULES
#
#---------- BEGIN FORWARD RULES
# Accept RELATED and ESTABLISHED connections
-A FORWARD -m conntrack --ctstate RELATED,ESTABLISHED -j ACCEPT
# Accept all from these sources
-A FORWARD -i eth1 -j ACCEPT
-A FORWARD -i wg0 -j ACCEPT
#---------- ENDING FORWARD RULES
COMMIT
#
#-----
# NAT
#-----
*nat
:PREROUTING ACCEPT [0:0]
:POSTROUTING ACCEPT [0:0]
:NAT4-DNAT - [0:0]
:NAT4-MASQ - [0:0]
#---------- BEGIN PREROUTING RULES
-A PREROUTING -j NAT4-DNAT
#---------- ENDING PREROUTING RULES
#
#---------- BEGIN POSTROUTING RULES
-A POSTROUTING -j NAT4-MASQ
#---------- ENDING POSTROUTING RULES
#
#---------- BEGIN NAT4-DNAT RULES
#---------- ENDING NAT4-DNAT RULES
#
#---------- BEGIN NAT4-MASQ RULES
-A NAT4-MASQ -o eth0 -j MASQUERADE
#---------- ENDING NAT4-MASQ RULES
COMMIT
EOF
Apply and save these rules:
/sbin/iptables-restore -c < /etc/iptables/iptables.rules
/sbin/iptables-save -c > /etc/iptables/rules-save
Backup original iptables config file for OpenRC service:
cp /etc/init.d/iptables /etc/init.d/iptables.bak
Add the following configuration:
cat <<\EOF > /etc/init.d/iptables
#!/sbin/openrc-run
# Copyright 1999-2011 Gentoo Foundation
# Distributed under the terms of the GNU General Public License v2
# $Header: /var/cvsroot/gentoo-x86/net-firewall/iptables/files/iptables-1.4.11.init,v 1.2 2011/12/04 10:15:59 swegener Exp $

description="IPv4/IPv6 packet filtering and NAT"
description_save="Save firewall state"
description_panic="Drop all packets"
description_reload="Reload configuration"

extra_commands="save panic"
extra_started_commands="reload"

iptables_name=${SVCNAME}
if [ "${iptables_name}" != "iptables" -a "${iptables_name}" != "ip6tables" ] ; then
        iptables_name="iptables"
fi

iptables_bin="/sbin/${iptables_name}"
case ${iptables_name} in
        iptables)  iptables_proc="/proc/net/ip_tables_names"
                   iptables_save=${IPTABLES_SAVE}
                   sysctl_ipfwd=net.ipv4.ip_forward;;
        ip6tables) iptables_proc="/proc/net/ip6_tables_names"
                   iptables_save=${IP6TABLES_SAVE}
                   sysctl_ipfwd=net.ipv6.conf.all.forwarding;;
esac

depend() {
        before net
        after sysctl
        use logger
        provide firewall
}

set_table_policy() {
        local chains table=$1 policy=$2
        case ${table} in
                nat)    chains="PREROUTING POSTROUTING OUTPUT";;
                mangle) chains="PREROUTING INPUT FORWARD OUTPUT POSTROUTING";;
                filter) chains="INPUT FORWARD OUTPUT";;
                *)      chains="";;
        esac
        local chain
        for chain in ${chains} ; do
                ${iptables_bin} -w 5 -t ${table} -P ${chain} ${policy}
        done
}

checkkernel() {
        if [ ! -e ${iptables_proc} ] ; then
                eerror "Your kernel lacks ${iptables_name} support, please load"
                eerror "appropriate modules and try again."
                return 1
        fi
        return 0
}
checkconfig() {
        if [ ! -f ${iptables_save} ] ; then
                eerror "Not starting ${iptables_name}.  First create some rules then run:"
                eerror "/etc/init.d/${iptables_name} save"
                return 1
        fi
        return 0
}

start() {
        checkconfig || return 1
        ebegin "Loading ${iptables_name} state and starting firewall"
        ${iptables_bin}-restore ${SAVE_RESTORE_OPTIONS} < "${iptables_save}"
        eend $?
        if yesno "${IPFORWARD}"; then
                ebegin "Enabling forwarding"
                /sbin/sysctl -w ${sysctl_ipfwd}=1 > /dev/null
                eend $?
        fi
        ${iptables_bin}-restore ${SAVE_RESTORE_OPTIONS} < "/etc/iptables/iptables.rules"
        ${iptables_bin}-save ${SAVE_RESTORE_OPTIONS} > "${iptables_save}"
}

stop() {
        if yesno "${IPFORWARD}"; then
                ebegin "Disabling forwarding"
                /sbin/sysctl -w ${sysctl_ipfwd}=0 > /dev/null
                eend $?
        fi
        if yesno "${SAVE_ON_STOP}"; then
                save || return 1
        fi
        checkkernel || return 1
        ebegin "Stopping firewall"
        local a
        for a in $(cat ${iptables_proc}) ; do
                set_table_policy $a ACCEPT

                ${iptables_bin} -w 5 -F -t $a
                ${iptables_bin} -w 5 -X -t $a
        done
        eend $?
}

reload() {
        checkkernel || return 1
        ebegin "Flushing firewall"
        local a
        for a in $(cat ${iptables_proc}) ; do
                ${iptables_bin} -w 5 -F -t $a
                ${iptables_bin} -w 5 -X -t $a
        done
        eend $?

        start
}

save() {
        ebegin "Saving ${iptables_name} state"
        checkpath -fm 0600 "${iptables_save}"
        ${iptables_bin}-save ${SAVE_RESTORE_OPTIONS} > "${iptables_save}"
        eend $?
}

panic() {
        checkkernel || return 1
        if service_started ${iptables_name}; then
                rc-service ${iptables_name} stop
        fi

        local a
        ebegin "Dropping all packets"
        for a in $(cat ${iptables_proc}) ; do
                ${iptables_bin} -w 5 -F -t $a
                ${iptables_bin} -w 5 -X -t $a

                set_table_policy $a DROP
        done
        eend $?
}
EOF
Restart service:
rc-service iptables restart
Example output:
 * Saving iptables state ...                                                                      [ ok ]
 * Stopping firewall ...                                                                          [ ok ]
 * Loading iptables state and starting firewall ...                                               [ ok ]
Check current iptables rules:
echo "" && \
echo "#-----" && \
echo "# RAW" && \
echo "#-----" && \
echo "" && \
iptables -t raw -S && \
echo "" && \
echo "#--------" && \
echo "# MANGLE" && \
echo "#--------" && \
echo "" && \
iptables -t mangle -S && \
echo "" && \
echo "#--------" && \
echo "# FILTER" && \
echo "#--------" && \
echo "" && \
iptables -S && \
echo "" && \
echo "#-----" && \
echo "# NAT" && \
echo "#-----" && \
echo "" && \
iptables -t nat -S
Example output:
#-----
# RAW
#-----

-P PREROUTING ACCEPT
-P OUTPUT ACCEPT

#--------
# MANGLE
#--------

-P PREROUTING ACCEPT
-P INPUT ACCEPT
-P FORWARD ACCEPT
-P OUTPUT ACCEPT
-P POSTROUTING ACCEPT

#--------
# FILTER
#--------

-P INPUT DROP
-P FORWARD DROP
-P OUTPUT ACCEPT
-A INPUT -i lo -j ACCEPT
-A INPUT -i wg0 -j ACCEPT
-A INPUT -i eth0 -m conntrack --ctstate INVALID -j DROP
-A INPUT -m conntrack --ctstate RELATED,ESTABLISHED -j ACCEPT
-A INPUT -p tcp -m tcp --dport 22 -j ACCEPT
-A INPUT -i eth0 -p tcp -m tcp --dport 53 -j ACCEPT
-A INPUT -i eth0 -p udp -m udp --dport 53 -j ACCEPT
-A INPUT -i eth0 -p udp -m udp --dport 51820 -j ACCEPT
-A INPUT -p tcp -m tcp -m multiport --dports 80,443,7443,8443,10443 -j ACCEPT
-A INPUT -p icmp -j ACCEPT
-A INPUT -p 112 -j ACCEPT
-A FORWARD -m conntrack --ctstate RELATED,ESTABLISHED -j ACCEPT
-A FORWARD -i eth1 -j ACCEPT
-A FORWARD -i wg0 -j ACCEPT

#-----
# NAT
#-----

-P PREROUTING ACCEPT
-P INPUT ACCEPT
-P OUTPUT ACCEPT
-P POSTROUTING ACCEPT
-N NAT4-DNAT
-N NAT4-MASQ
-A PREROUTING -j NAT4-DNAT
-A POSTROUTING -j NAT4-MASQ
-A NAT4-MASQ -o eth0 -j MASQUERADE
Main References
- OneKE in the OpenNebula one-apps project
- Full documentation for the OneKE appliance
- Download OneKE from the Appliances Marketplace: